Subscribe nowjsy
MyBrewbot Screenshots
Settings Screen
From this screen you can:
- Give your fermenter a name
- Name the beer
- Assign the fermenter/device function
- State the temperature unit
- Switch 'power' on for the fermenter. This starts sending smartplug on/off signals
- Input the yeast and BJCP details
- Set ceiling, floor OG and TG parameters
- Set hysteresis
- Set the compressor delay (in minutes)
- Assign the devices used to control temperature and monitor SG (Probe, Tilt, iSpindel)
- Set alarm tolerances and switch on/off
- Assign values to charts.

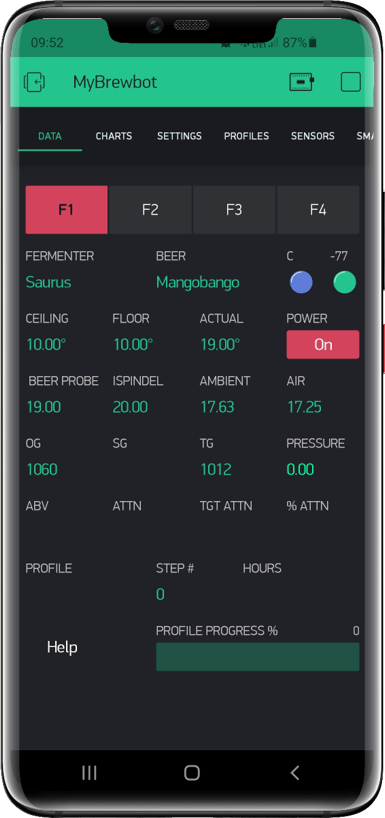
Data
From this screen you can see all of the data collected by the controller from your probes:
- Fermenter and Beer name
- The status led for the heating cooling system (blue = cooling, red = heating, white = neutral, amber = off)
- See the signal strength for iSpindel/Tilt
- State the temperature settings for the beer
- Switch 'power' on/off for the fermenter. This starts sending smartplug on/off signals
- See the temperature data from probes, Tilt, iSpindel
- See SG and pressure data from sensors
- See OG, SG, TG, ABV, Attenuation, Target Attenuation and percent reached
- See profile progress information where set
Charts
From this screen you can see all of the current data charted by the controller:
- For each fermenter/beer you can see the data that you set as the series in the settings screen charted over time
- You can decide what values are charted.
- The data for SG and Pressure is shown on the same axis as temperature and is converted so that it shows a trend, rather than the actual values. Actuals are shown in the data screen.
- Data can be viewed in full screen by touching the widget at the right hand bottom side of the chart
- Data can be downloaded or cleared by touching the three dot widget at the right hand bottom side of the screen

Profiles
From this screen you can:
- Name a Profile
- Start, stop, pause the profile
- Set the profile in test or live mode (test runs through the profile at 1 minute intervals - live mode at 1 hour intervals)
- Set the step type. The steps available are
- Time over temperature (changes temperature but only progresses to the next step when time reached)
- Temperature over time (changes temperature but only progresses to the next step when temperature is reached)
- Free rise (lets the yeast do it's own thing within the start and end temperature settings)
- SG (changes temperature but only progresses to the next step when the target SG is reached) - Set the start and end temperatures for the step
- Set the number of days for the step (accepts decimals - so 1.5 days is 36 hours)
- Set the Specific Gravity trigger (for SG step types)

Sensors
From this screen you can:
- See new probes as they are discovered by the controller
- Give the probe a 'user friendly' name
- Assign the probe to a task (Beer, Ambient, common air or common ambient)
- Assign a Tilt to the fermenter and calibrate its temperature and SG
- Assign an iSpindel to the fermenter
- Assign the pressure sensor to a fermenter
- Calibrate the pressure sensor

Smartplugs
From this screen you can:
- Program smartplugs from the controller
- Program the controller using the smartplugs remote controller
- Assign plugs to tasks (hot, cold, aux 1 etc)
- Test plugs

Systems Settings
From this screen you can:
- Unlock the UI
- See the installed software, controller version and the latest available software
- See how long the controller has been operational
- See the controller's IP address (for iSpindel operation)
- Input MyBrewbuddy IP address and set collection on.
- Request system reports
- Restart the controller remotely
- Clear the controller's wifi credentials (if you are moving/changing your router etc)
- Do an 'over the air' software update.
- Save and retrieve settings for the controller
- Set controller elements to their default settings

©MyBrewbot 2020